ITRavels
👀
Decouple Sign Up With Cognito
I’ve decided to start a new exercise. Let’s presume we’ve already got a sign-up process in place, via an API or otherwise and we decide to start using Cognito to handle all registrations. If you’re unfamiliar with Cognito, you can do a fast read on my previous article available here.
The exercise has two parts, one being the client written using Javascript and the other being the server, an architecture built with CloudFormation. I’m going to try to keep the client as clean as possible and if you haven’t heard of CloudFormation, this is a simple way of building infrastructure inside AWS using a templating system written using YAML or JSON (more info here).
Prepare the client
Make sure you’ve got npm installed, then go ahead and create a folder and inside it run:
# npm init && npm install --save aws-sdk amazon-cognito-identity-js && npm install --save-dev json-loader webpack webpack-cli
Once that’s finished, create a file called webpack.config.js in the root folder and populate it with this:
// Import path for resolving file paths
var path = require('path');
module.exports = {
    // Specify the entry point for our app.
    entry: [
        path.join(__dirname, 'browser.js')
    ],
    // Specify the output file containing our bundled code
    output: {
        path: __dirname,
        filename: 'bundle.js'
    },
    module: {
        /**
         * Tell webpack how to load 'json' files.
         * When webpack encounters a 'require()' statement
         * where a 'json' file is being imported, it will use
         * the json-loader.
         */
        rules: [

        ]
    },
    mode: "development"
};
At this point, webpack will be configured, so we need to add it as a script inside package.json. Go ahead and add "build": "webpack" right after "test" script inside that file. The new package.json file should look like this:
{
  "name": "decouple_sign_up_with_cognito",
  "version": "1.0.0",
  "description": "",
  "main": "index.js",
  "scripts": {
    "test": "echo \"Error: no test specified\" && exit 1",
    "build": "webpack"
  },
  "author": "",
  "license": "ISC",
  "dependencies": {
    "aws-sdk": "^2.348.0"
  },
  "devDependencies": {
    "json-loader": "^0.5.7",
    "webpack": "^4.25.0",
    "webpack-cli": "^3.1.2"
  }
}
We’re almost there, we are going to use one js file to write our code, it’s called browser.js and webpack needs to have it in order to compile the output js file that is going to be used by our index.html entry point. You can go ahead and create an empty file called browser.js and since we’re at it, let’s do the index.html too:
# touch browser.js && touch index.html
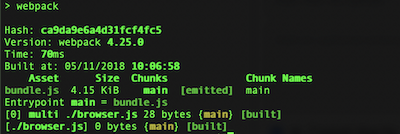
Finally, let’s test if everything works correctly by running:
# npm run build
You should see something like this:
Prepare the Server
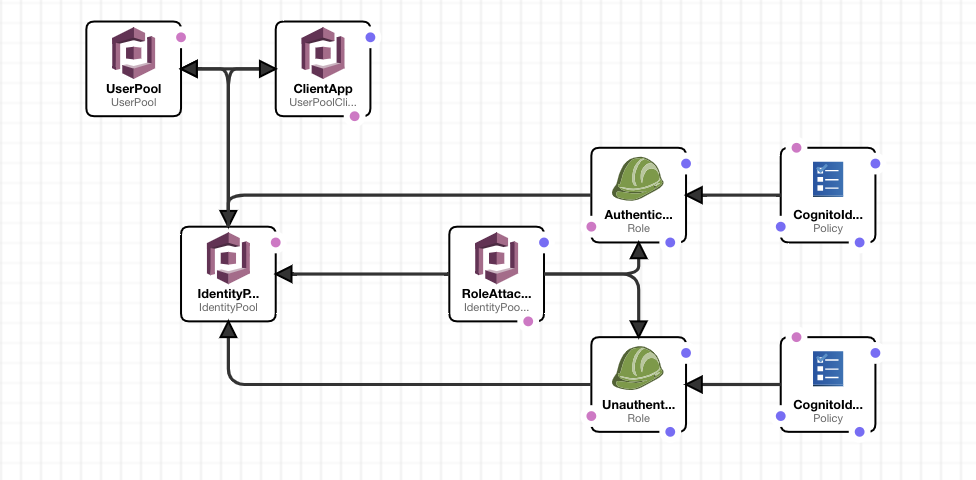
The server has two main parts. One User Pool with its attached Client App and one Federated Identity with two roles attached, one for unauthenticated users(guests) and one for authenticated users.
In theory we only need the first part for this exercise but it still worth showing how Federated Identities work and how can be used to authorize users to AWS services.
The schema looks like this:
First, we need to build it. After you login into your AWS Console, go to CloudFormation Management Console in your chosen region, click Create Stack, then Upload a template to Amazon S3 and upload the following template decouple_sign_up_with_cognito.cloudformation.
Once the script has finished, go to Cognito and you’ll see one User Pool called ‘TestUserPool’ and one Identity Pool called ‘TestIdentityPool’.
At this point, we have all we need to start writing code inside our app and use the underlying architecture to sign up and authenticate users.
The fun begins
There are two scenarios that come to mind when I think about decoupling the sign-up process:
- New users that register from this point onwards should register directly through the new freshly built system with CloudFormation, in which case we need a way to link those new users from User Pools to our internal application user ids
- Already existent users will have to be migrated and therefore added to the User Pool and the way we’re going to do that is allow them to login with Cognito even if we don’t have them already in the User Pool and use a lambda trigger that will validate them agains the old authentication system (the one already used inside the app) then return instructions for the User Pool to create this user if everything went ok.
The first point is pretty straight forward. In our browser.js file we add the following lines:
- build the CognitoUserPool object:
var AmazonCognitoIdentity = require('amazon-cognito-identity-js'); var poolData = { UserPoolId : 'your user pool id', ClientId : 'your application client id' }; var userPool = new AmazonCognitoIdentity.CognitoUserPool(poolData); - register the user:
userPool.signUp('user@example.com', 'mypassword', [], null, (err, result) => { if (err) { console.log(err.message || JSON.stringify(err)); return; } console.log('User has been created'); }); - validate the user (after the previous step, user will receive an email with a validation code to confirm the account):
var cognitoUser = new AmazonCognitoIdentity.CognitoUser({ Username: 'user@example.com', Pool: userPool }); cognitoUser.confirmRegistration(validateCode, true, function(err, result) { if (err) { console.log(err.message || JSON.stringify(err)); return; } console.log('SUCCESS'); }); - as an optional extra step, let’s presume we need to verify if a user is already authenticated and if it’s not, we authenticate:
var cognitoUser = userPool.getCurrentUser(); // get current user from local storage
if (cognitoUser != null) {
    // get current session
    cognitoUser.getSession((err, result) => {
        if (err) {
            console.log(err.message || JSON.stringify(err));
            return;
        }
        // get some user information
        cognitoUser.getUserAttributes(function(err, attributes) {
            if (err) {
                console.log(err.message || JSON.stringify(err));
                return;
            }
            console.log(attributes);
        });
    });
} else {
    // we authenticate the user
    var cognitoUser = new AmazonCognitoIdentity.CognitoUser({
        Username: email,
        Pool: userPool
    });

    cognitoUser.setAuthenticationFlowType('USER_PASSWORD_AUTH'); // in order to trigger the migration, we need to use this flow
    cognitoUser.authenticateUser(new AmazonCognitoIdentity.AuthenticationDetails({
        Username: 'user@example.com',
        Password: 'mypassword'
    }), {
        onSuccess: (result) => {
            var accessToken = result.getAccessToken().getJwtToken();
            cognitoUser.getUserAttributes(function(err, attributes) {
                if (err) {
                    console.log(err.message || JSON.stringify(err));
                    return;
                }

                console.log(attributes);
            });
        },
        onFailure: (err) => {
            console.log(err.message || JSON.stringify(err));
        }
    });
}
For the second point, we need to create a basic lambda function with basic role policies (CloudWatch logs access - this is the default role that AWS created automatically for new lambda functions).
This function will be triggered whenever a login with Cognito gets initiated and no user exists with that email. For the purpose of this exercise, I’ve created a Node.js 8.10 function with the following code:
exports.handler = async (event) => {
    if ( event.triggerSource == "UserMigration_Authentication" ) {
        const { userName:email, request: { password } } = event;

        var user_is_authenticated = false;

        // this is where we need to authenticate with existing authentication mechanism with the email and password
        // user_is_authenticated = my_custom_authentication(email, password);

        if (user_is_authenticated)
            // after the authentication is successful, we return the successful response
            event.response.userAttributes = {
                email,
                email_verified: true
            };
            event.response.finalUserStatus = "CONFIRMED";
            event.response.messageAction = "SUPPRESS";
        }
    }
    return event;
};
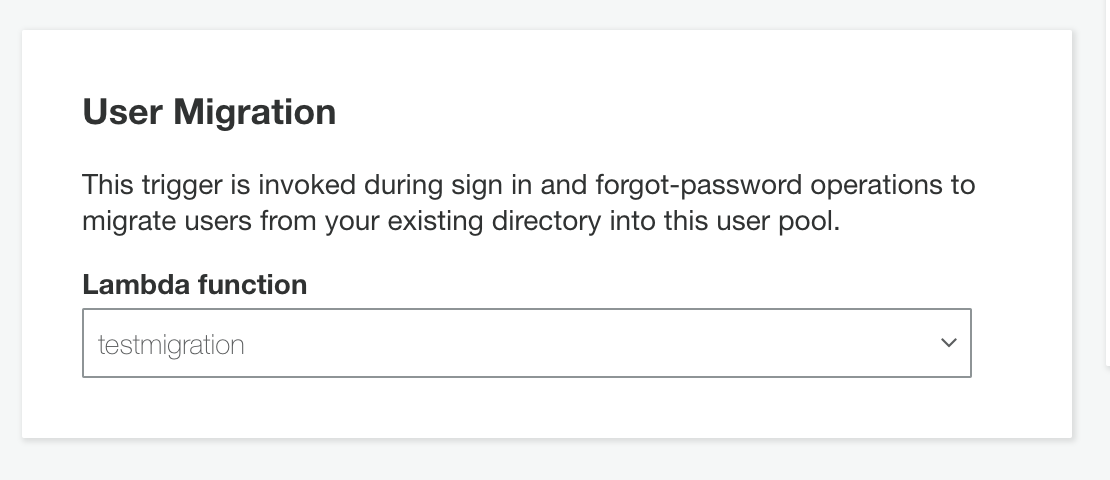
Once the function is saved and tested, we add it as a trigger for the User Migration event in Cognito User Pool configuration.
Finally
I’ve put together a simple test repo using the above code that makes it easier to register, validate and login new users. You can check it out here